An SDR for $17 – The R820T USB RTL-SDR DVB-T Dongle

You may have heard of the latest SDR craze to hit the radio hobby – the RTL based USB dongle TV tuners. These were originally made to receive and decode the European standard digital television broadcasts. An enterprising hobbyist discovered that they can be tuned throughout the VHF and UHF range, and that you can get at the raw sampled data from the onboard A/D converter (only 8 bit, however). This allows them to be used as a very inexpensive Software Defined Radio (SDR) for VHF and UHF. How inexpensive? Mine was $17 shipped, although you can find them for even less, if you’re willing to get them direct from China and wait a few weeks for delivery.

Here is what I got:

There’s the dongle itself, as well as the small (about 4″) antenna.

It’s interested to note that the enclosure actually says SDR on it, the word has apparently gotten out about the SDR applications for this dongle, and someone is private branding them.

Here’s what the inside looks like:

The USB connector is on the left, the MCX style RF connector is on the upper right.

There are control programs available for Windows, Mac OS X, and Linux. For software, first I decided to try rtl-sdr I copied the libraries to the specified locations, restarted, and was greeted with:

>:rtlsdr_osx cps$ rtl_test -t
Found 1 device(s):
0: ezcap USB 2.0 DVB-T/DAB/FM dongle

Using device 0: ezcap USB 2.0 DVB-T/DAB/FM dongle
Failed to open rtlsdr device #0.

It’s possible this is an older version of the rtl-sdr package, that expects the E4000 tuner chip. (Although a less cryptic error message would sure be helpful)

Then I tried Cocoa Radio. It crashes on launch. So far open sores is zero for two.

So next I tried the Mac OS X port of gqrx. Much better! It came right up, and within a minute I was receiving FM broadcast stations. I have noticed that if I make a change to the sample rate, I need to quit and re-start the app before putting it into run mode, or it crashes.

The sensitivity is not bad, I was able to pick up stations about 50 or 60 miles away using the included tiny 4″ antenna, laying on my desk.

Below is a screenshot of gqrx running on the FM band, you can see three FM broadcast stations, at 97.9, 98.5 and 99.1 MHz, the latter is tuned in for demodulation.:

I was also able to pick up 2m packet radio transmissions on 144.39 MHz, and one of the NOAA weather radio stations, on 162.525 MHz.

There are many varieties of these TV tuner dongles out there, mostly the difference is the RF tuner chip used. Previously the E4000 tuner was the preferred one for SDR applications, as it had the widest tuning range, although with a gap in the middle. It apparently is no longer made and is difficult to find tuners that use it. Currently the R820T tuner chip seems to be the preferred one for SDR use, the tuning range is slightly less, but there is no gap. Some eBay vendors identify the chip used, many do not, but there are lists online of the various USB dongles by brand name and model number, with the tuner chip specified, such as here.

My next project was mounting the dongle in a small metal enclosure, with a different RF connector, so I can easily connect one of my existing outdoor antennas to it. Read all about it here.

A Very Busy Christmas Weekend/Eve For Pirates

Here’s what folks have been hearing since Friday night. 41 different North American pirate radio transmissions so far, a total of 163 loggings, and it’s not even Christmas yet!

A big thank you to the operators for their shows, and the listeners for their reports.

All of these loggings can be viewed at the HF Underground

Pirate Radio Boston 6925 AM 1945 UTC December 24, 2012
WBNY 6240 AM 1604 UTC December 24, 2012
Eccentric Shortwave 6930 USB 1529 UTC December 24, 2012
Channel Z 6925 AM 1400 UTC December 24, 2012
UNID 6925 USB 1455 UTC December 24, 2012
Metro Radio International 6975 AM 1323 UTC December 24, 2012
Radio Ronin 6920 AM 1308 UTC December 24, 2012
Northwoods Radio 6925 USB 1200 UTC December 24, 2012
Channel Z 6925 AM 0427 UTC December 24, 2012
UNID 6955 AM 0212 UTC December 24, 2012
Rave On Radio 6925 USB 0200 UTC December 24, 2012
Radio GaGa 6925 USB 0140 UTC December 24, 2012
Radio Appalachia 6935 AM 0125 UTC December 24, 2012
Dit Dah Radio 6925 USB 0025 UTC December 24, 2012
Dit Dah Radio 6935 USB 2156 UTC December 23, 2012
WBNY 6913.34 AM 2150 UTC December 23, 2012
WKND 6924.6 AM 2148 UTC December 23, 2012
Metro Radio International 6925 AM 2008 UTC December 23, 2012
WEDG The Edge 1610 AM 1700 UTC December 23, 2012
Pirate Radio Boston 6925 AM 1612 UCT December 23, 2012
Pirate Radio Boston 6950 AM 1610 UTC December 23, 2012
Pirate Radio Boston 6925 AM 1805 UTC December 23, 2012
Channel Z 6925 AM 1346 UTC 23 December 23, 2012
1720 KHz “The Big Q” 0509 UTC December 23, 2012
Channel Z 6925 AM 0405 UTC December 23, 2012
WPOD 6925 USB 0130 UTC December 23, 2012
Wolverine Radio 6925 USB 0048 UTC December 23, 2012
Toynbee Radio 6925 AM 2258 UTC December 22, 2012
Monkey Mayan Memorial Radio 6925 AM 2222 UTCDecember 22, 2012
UNID 6950 USB 2218 UTC December 22, 2012
UNID 6924.7 Khz AM 2215 UTC December 22, 2012
Toynbee Radio 6925 AM 2131 UTC December 22, 2012
Pirate Radio Boston 6949.39 AM 2015 UTC December 22, 2012
UNID 6935 AM 1902 UTC December 22, 2012
Pirate Radio Boston 6949.39 AM 1355 UTC 2December 22, 2012
Rave On Radio 6925 USB 1241 UTC December 22, 2012
The Big Q 1720 & 1710 AM 0525 UTC December 22, 2012, 2208 UTC
Captain Morgan Shortwave 6950.7 AM 0240 UTC December 22, 2012
UNID 6925 AM 0225 UTC December 21, 2012
UNID 6924 AM 0203 also 6929 AM 0207 December 22, 2012
Insane Radio 6925 AM 0121 UTC December 22, 2012
Insane Radio SSTV 6925 AM 0021 UTC December 22, 2012

WWV and WWVH Via Both Long and Short Path on 15 MHz and I can Hear Russia From My House

In Measuring The Distance To A Shortwave Radio Station we looked at how the propagation delay in a shortwave signal can be used to estimate the distance to the station.

I ran some more tests the other day:

Below is a recording of 15 MHz, taken at 2300 UTC on December 13, 2012:

The GPS 1 PPS reference is on the top trace, and the audio from the radio is on the lower trace.

You can see the one second tick pulse from WWV in the audio, as well as two pulses from WWVH, the first (weaker) one is the normal (short) path signal, and the second one is via long path. We can confirm this is the case by converting the time delays into distance. We’ll use the same formula as in the previous article, we subtract off the 286 sample delay from the radio, multiply by 22.676 to convert the delay in samples to microseconds, then multiply by 0.186282 (the speed of light in miles per millisecond) to convert the delay into miles.

For WWV, the measured delay from the 1 PPS pulse is 660 samples. (660-286) * 22.676 * 0.186282 = 1580 miles
For WWVH short path, the measured delay was 1516 samples: (1516-286) * 22.676 * 0.186282 = 5196 miles
For WWVH long path, the measured delay was 5080 samples: (5080-286) * 22.676 * 0.186282 = 20250 miles

The distance to WWV is 1480 miles, and to WWVH is 4743. The long path distance to WWVH is 20158 miles.

Remember, the calculated distances can be longer than the great circle distance, due to the signal making one or more (many more in the case of long path) hops between the Earth and the ionosphere. Plus, there is the experimental error.

And here is one more example, this time it is the Russian time station RMW, on 14996 kHz, recorded at 1157 UTC on December 10, 2012:

The delay was 1835 samples: (1835-286) * 22.676 * 0.186282 = 6543 miles.
The great circle distance is 4821 miles.

Measuring The Distance To A Shortwave Radio Station

In a previous post, I showed how it was possible to crudely measure the speed of light (or at least another type of electromagnetic radiation, radio waves, in this case) by measuring the time delay between two shortwave radio time stations, WWV and WWVH.

I’ve decided to re-do that experiment, but in a slightly different way. Rather than measure the speed of propagation, I will use that speed to determine the distance to the radio station.

Various time stations transmit precise time on several shortwave frequencies. Here in the USA, we have WWV in Ft. Collins, Colorado, which transmits on 2.5, 5, 10, 15, and 20 MHz. We also have WWVH in Kekaha, Hawaii, which transmits on 2.5, 5, 10, and 15 MHz. These stations transmit an audio “tick” at exactly each UTC second. There is also the Canadian station CHU, located near Ottawa, Ontario, which transmits on 3330, 7850, and 14670 kHz.

One way to measure the speed of radio waves (and light) would be to measure how long it takes for the tick to travel a fixed distance. Divide the distance by the time, and we have the speed of light. However, that requires knowing the exact UTC time locally. This can be done with a GPS unit that outputs a 1 PPS (pulse per second) signal.

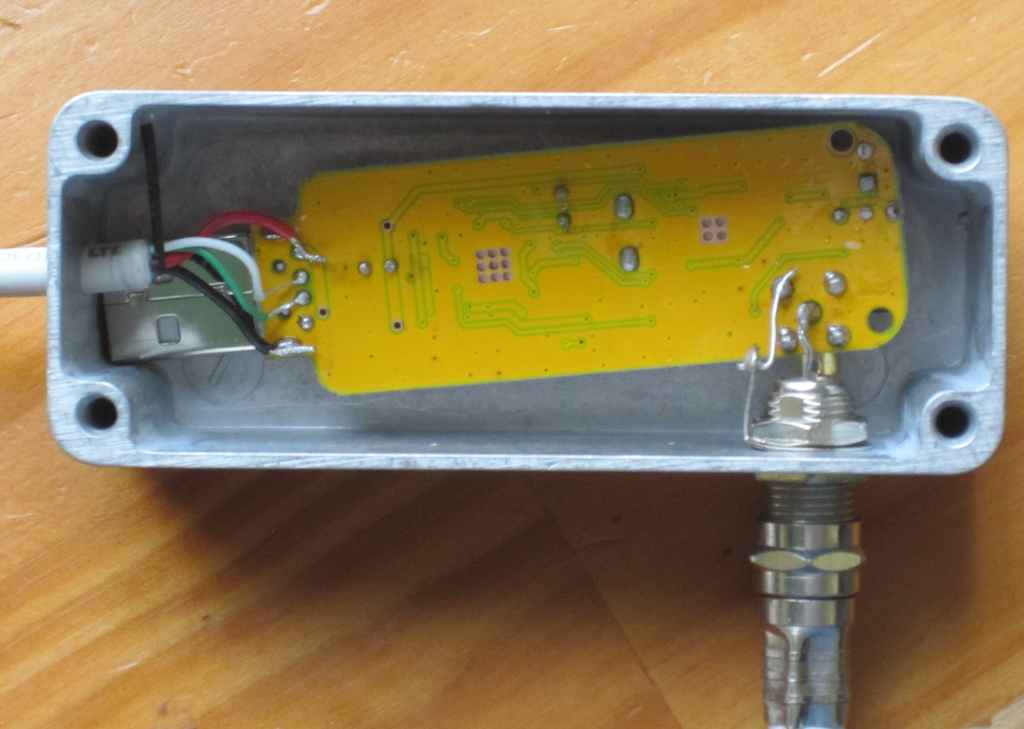
How to feed these signals into the computer, so they can be measured? The radio audio is easy enough, feed it into the sound card. It turns out the 1 PPS signal can also be fed into the sound card, on the other channel. I used a capacitor to couple it.

The first measurement that is required is one to determine what time delay is added by the radio electronics. In my case, I was using a JRC NRD 545 receiver, which has DSP (Digital Signal Processing) to implement the audio filters. This certainly adds a time delay. I therefore needed to run some baseline measurements, to determine how long this delay was.

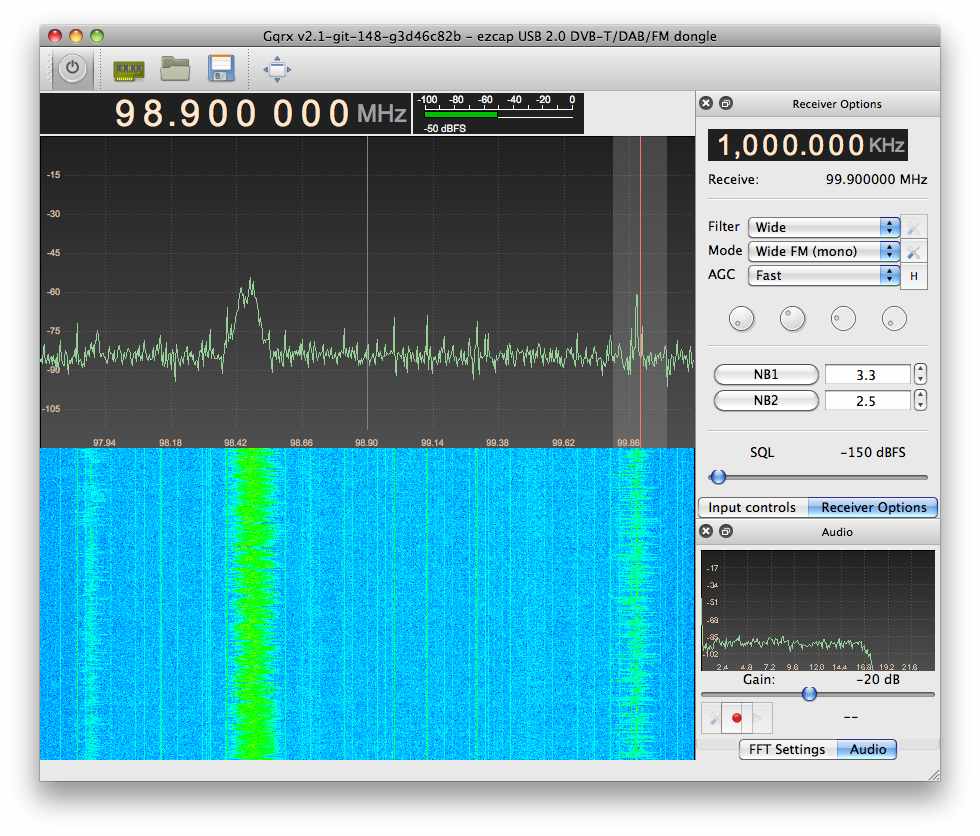
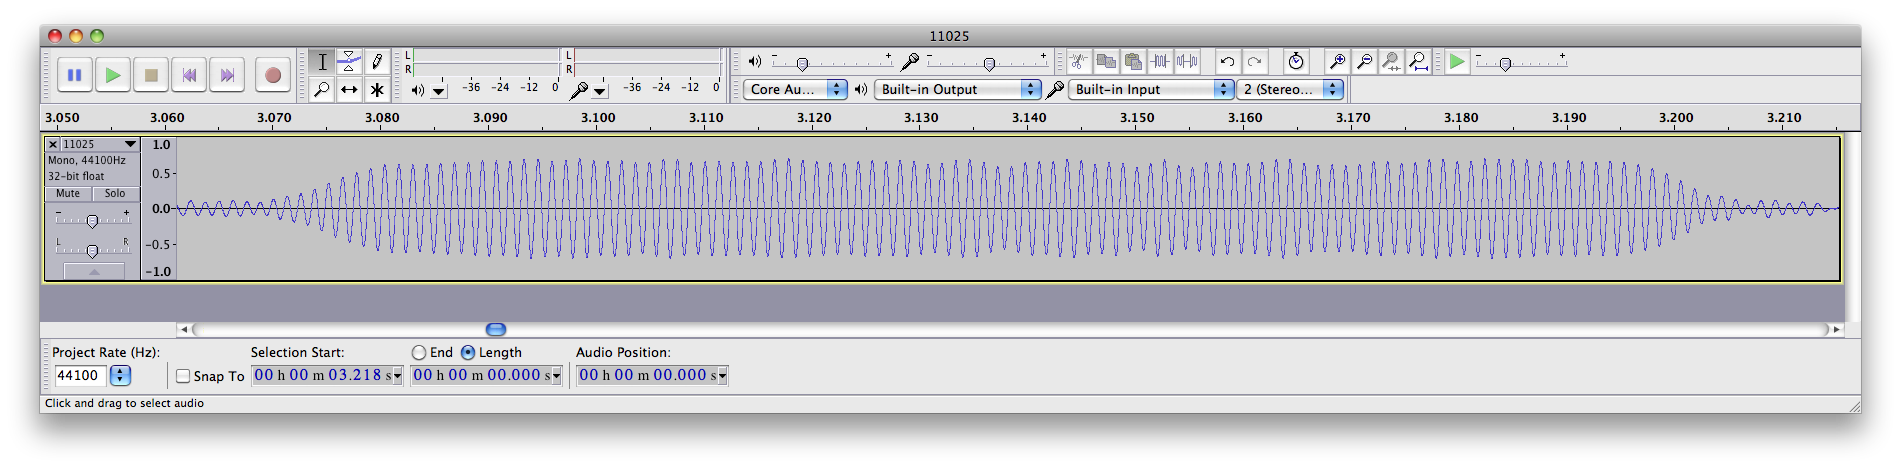
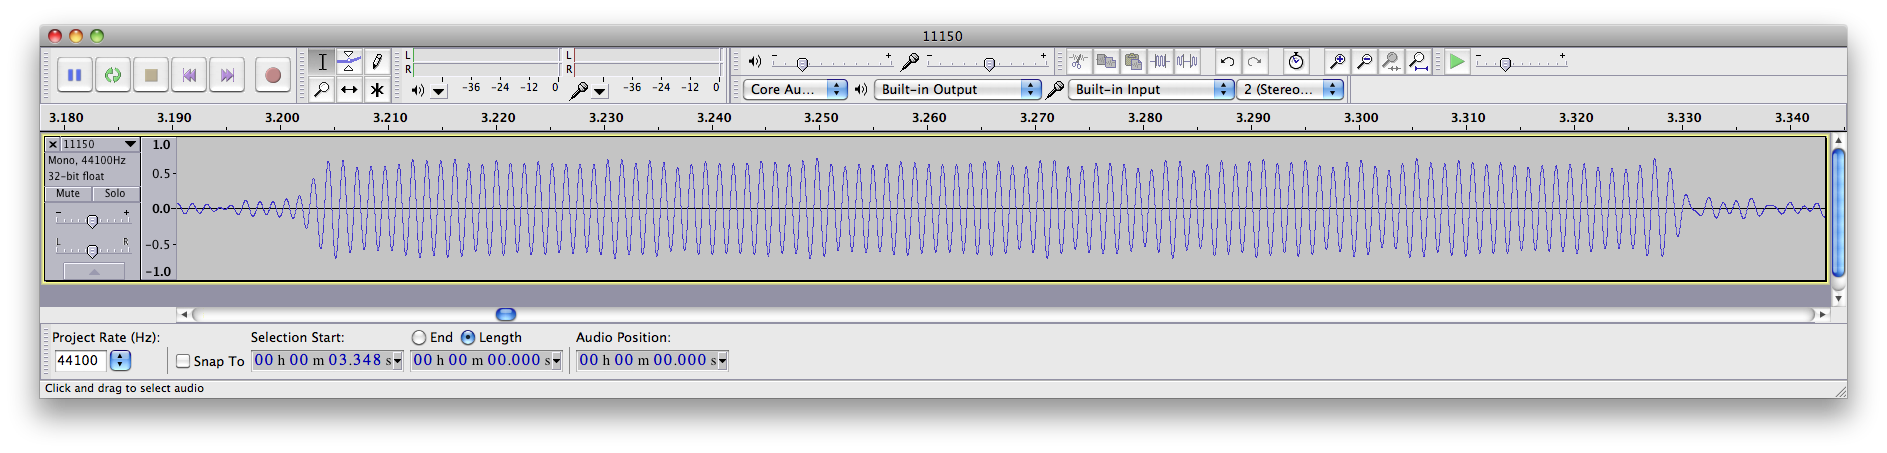
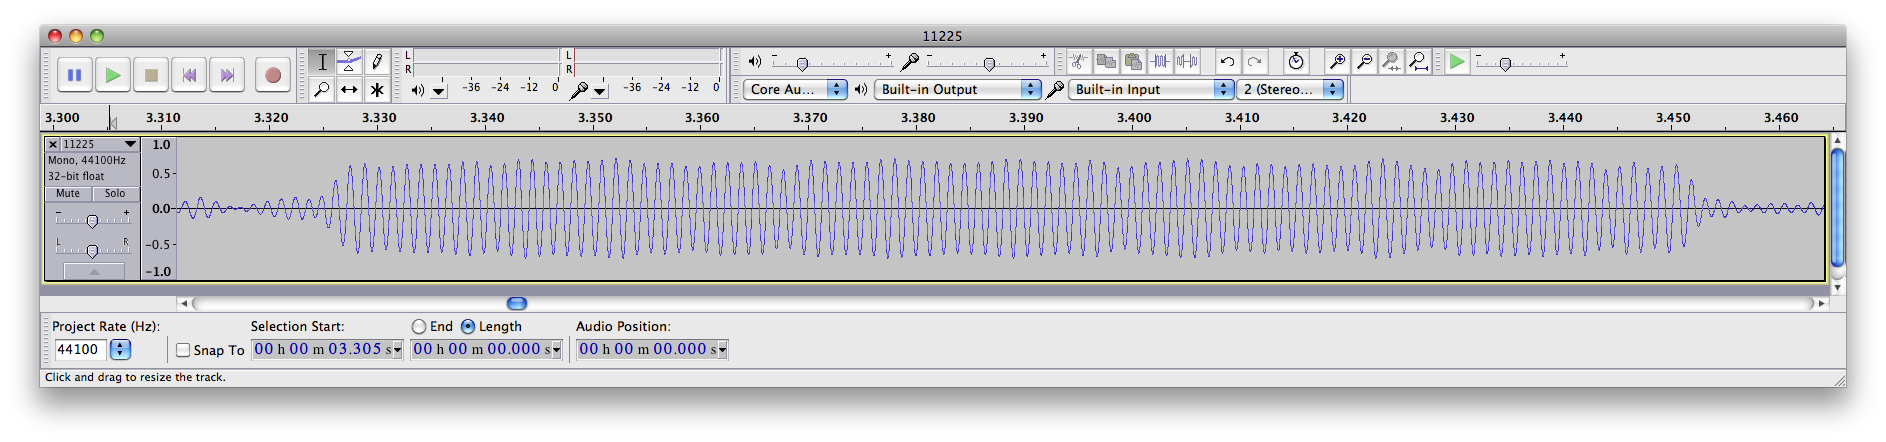
I fed the same 1 PPS signal into the antenna jack of the radio. The signal is a short (10 microsecond pulse) that is rich in harmonics, so it produces a noticeable “tick” sound every second. I then recorded the audio from the radio, along with the 1 PPS signal fed into the other channel, and obtained this data (click on the graph to enlarge it):

I measured the time delay between the two ticks, and found it to be 286 samples. At 44.1 kHz, each sound sample is 22.676 microseconds. Multiplication gives us the time delay, namely 6485 microseconds. This delay added by the radio is constant, provided I do not adjust the IF filtering parameters (which were set to USB mode, 4.0 kHz wide, for all tests).

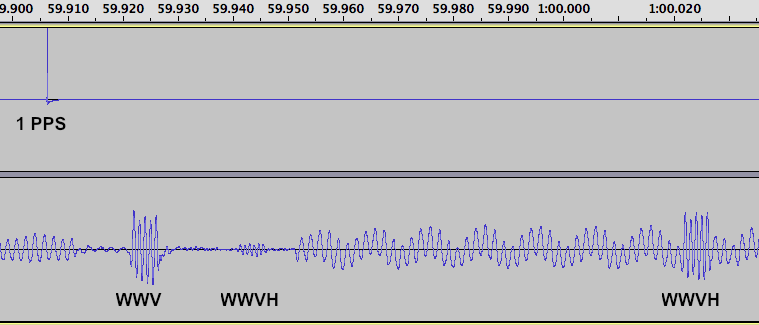
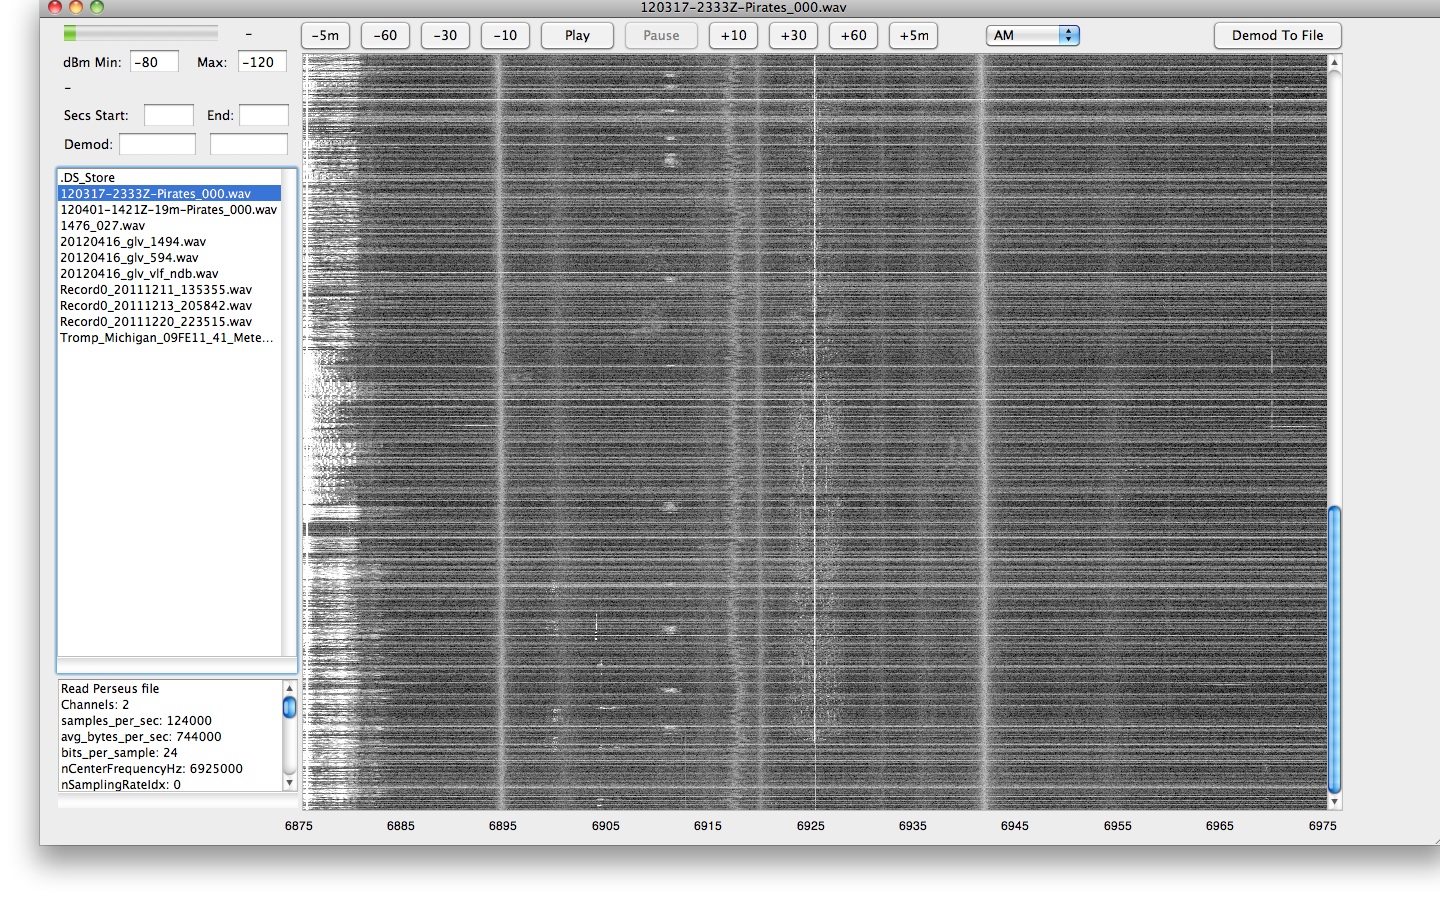
Next, the antenna was reconnected, an the radio tuned to 15 MHz. At this time of the day (about 2100 UTC) it is possible to hear both WWV and WWVH. Here’s the sound recording:

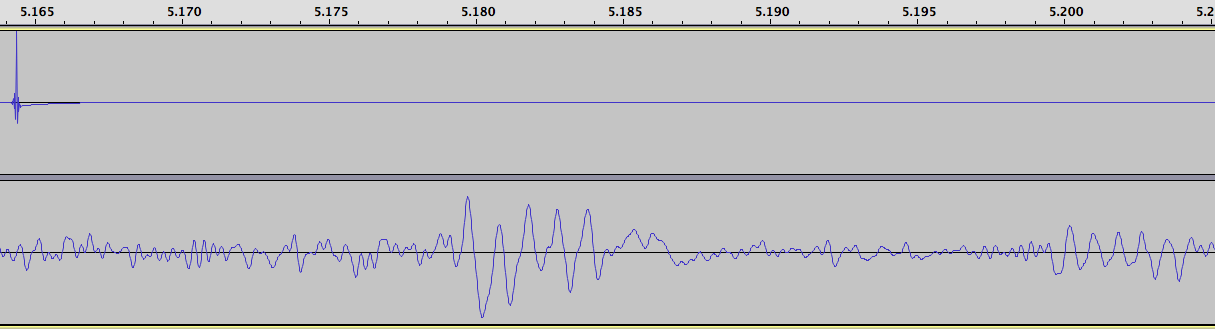
The WWV pulse occurs at about 5.18 seconds on the recording, and WWVH, much weaker and harder to see, at about 5.2 seconds.

The delay for the WWV pulse is 657 samples. Subtracting the radio delay of 286 gives us a delay due to propagation of 371 samples. Multiplying by our conversion factor of 22.676 microseconds per sample gives us 8413 microseconds.

Light (and radio waves) travel at 186,282 miles per second or about 0.186 miles per microsecond. For the metric inclined, that’s 299.792 km/sec or 0.300 km per microsecond. So multiplying our time in microseconds by the distance light travels each microsecond gives us the distance:

8413 * 0.186 = 1567 miles (2522 km)

The actual distance, along the Earth’s surface, from my location to WWV is 1480 miles, or 2382 km. Why the discrepancy? The radio waves do not travel along the Earth’s surface, but instead are reflected from the ionosphere, which is several hundred miles up. This means the actual path they take is longer. We’ll try to take that into account, a little further down.

The delay for the WWVH pulse is 1550 samples. Subtracting the radio delay of 286 gives us a delay due to propagation of 1264 samples. Multiplying by our conversion factor of 22.676 microseconds per sample gives us 28662 microseconds. We’ll do our next multiplication again, to convert to distance:

28662 * 0.186 = 5339 miles (8592 km)

The actual distance from my location to WWVH is 4743 miles, or 7633 km.

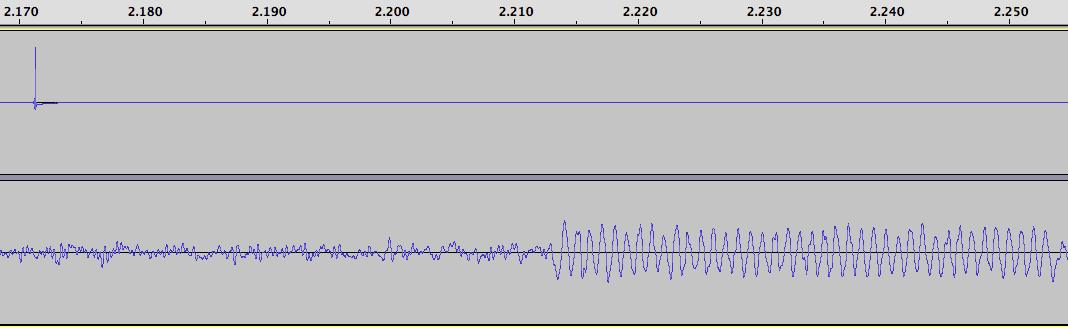
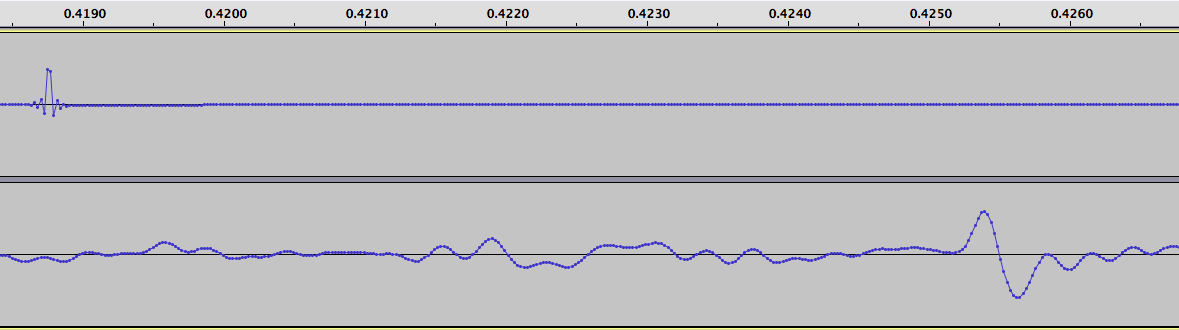
Next, here’s a recording from the Canadian time station, CHU:

The delay for the CHU pulse is 401 samples. Subtracting the radio delay of 286 gives us a delay due to propagation of 115 samples. Multiplying by our conversion factor of 22.676 microseconds per sample gives us 2607 microseconds. We’ll do our next multiplication again, to convert to distance:

2607 * 0.186 = 486 miles (782 km)

The actual distance from my location to CHU is 407 miles, or 656 km.

Now let’s try to take into account the actual path of the radio waves, which get reflected off the ionosphere. We need to know the height of the ionosphere, which unfortunately is not constant, nor is it the same over each part of the Earth. Here is a map showing the approximate height, while the above recordings were taken:

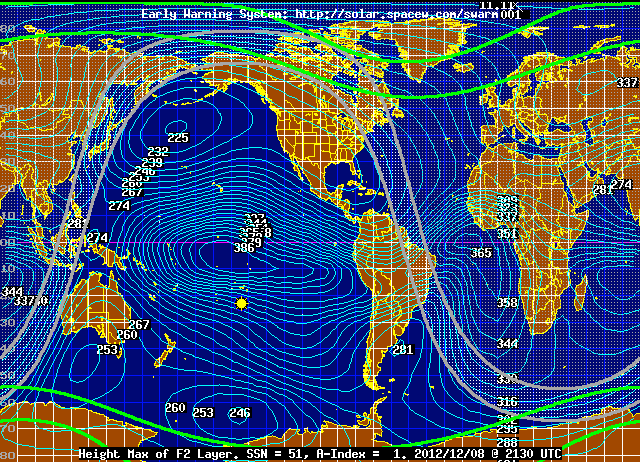
In the case of the path to CHU, the height is about 267 km, or 166 miles.

We also need to determine the straight line path between my location and CHU, through the Earth, vs the distance along the Earth’s surface. This can be calculated, and it is 391 miles, or 629 km.

We’ll determine what the actual path length is for a radio signal traveling this distance. It looks like a triangle, with a height of 166 miles, and a base of 391 miles. We need to determine the other two sides to find the total path length. All we need to do is take half of 391 miles, which is 195.5 miles, square it, add to that 166 squared, and take the square root, then double our answer. The result is 513 miles, which is very close to our measured value of 486 miles. We’re off by a little more than 5%.

Next let’s try WWV: The actual distance is 1468 miles or 2362 km. Doing our math, using an approximate FoF2 ionosphere height of 246 km (153 miles): Half of 1468 miles is 734 miles, we square that and add to 153 squared, and take the square root, and double our answer, getting 1500 miles. Our measured distance was 1567 miles, so we’re off by less than 5%.

Next, the case of WWVH. This is more complicated, as the signal probably is making more than one “hop”, that is, it is going up to the ionosphere, reflected down to Earth, and then reflected back up again, and down again. This may possibly occur multiple times.

We’ll try doing the math anyway. The actual distance is 4588 miles or 7383 km. Doing our math, using an approximate FoF2 ionosphere height of 253 km (157 miles): Half of 4588 miles is 2294 miles, we square that and add to 157 squared, and take the square root, and double our answer, getting 4598 miles. Our measured distance was 5339 miles, an error of 16%. But again, we don’t know how many hops there were. Still, not a bad effort.

Does anyone else have a GPS receiver with a 1 PPS output? If so, I’d like to hear from you, I have some additional experiments in mind.

Mysterious Ditter Network

First observed two days ago, there seems to be a new (to us HF listeners, anyway) network of HF ditter CW transmissions. The purpose of this network, as well as who is operating it, is unknown. It is possible they are for propagation monitoring. Based on observations of listeners and propagation characteristics, it would appear that at least some of the transmissions are coming from North America, possibly the Central US.

The transmissions do not occur at the same time on all frequencies. It appears that each transmitter steps through the frequencies. The following image shows the received signal on three of the frequencies (click on the image to view it as a larger size):

As you can see, thea transmission on each frequency begins right after the transmission on the previous frequency ends. This data was obtained by running a netSDR receiver in 500 kHz wide I/Q capture mode. The resulting recording file was then demodulated at each frequency of interest.

You can also see the second (weaker) dit on the 11150 tranmsission, that occurs shortly before the stronger main dit. (It is less obvious before the second dit, but you can see it, if you squint)

Each pulse (dit) is 130 milliseconds long, and they repeat every 6 seconds.

Next, the demodulated signal for a ditter transmission on each of the above frequencies is shown magnified, to see the exact times of each transmission.


How to find these transmissions:

I find that using an SDR is the easiest way, as you can observe a large portion of the spectrum at once. I use a 500 kHz wide view, and step through HF, looking for the periodic dits. But you can certainly use any radio. Note that the frequencies are all multiples of 25 kHz. They also sometimes occur in groups of three relatively associated frequencies. There are likely additional frequencies that have not yet been discovered.

If you’re hearing any of these transmissions, or have discovered possible additional frequencies, please let us know with a comment!

Transmissions on the following frequencies have been observed (all in kHz):
5450
5575
6225
6550
6750
7700
8000
8275
8775
8825
8900
8975
9050
9225
10050
10450
10575
10900
11025
11150
11225
11300
12450
13100
13250
13325
13875
14400
15100
15400
15625
16000
16350
16550
16725
17475
17650
17950
17975
18050
18100
18200
18450
18625
19300
19650
20100
20175
20250
22050
24050

Propagation Gives Away Your Location

Being as pirate radio is, well, illegal, operators like to stay anonymous. At least ops who want to avoid the FCC. Naturally, most ops consider keeping their location secret very important. Some even go so far as subtly, or not so subtly, providing false clues about their location, in an effort to fool the radio authorities. Unfortunately, basic rules of radio propagation make this futile.

A warning in advance. I’m going to be discussing some basic shortwave radio propagation theory. Nothing here is brand new, or unknown to anyone in the radio field. Certainly not the radio authorities. Some fur… err… feathers are possibly going to be ruffled by what is presented below, possibly with loud protests of “destroying pirate radio” and “releasing the identities of operators”. Nothing could be further from the truth. This is Propagation 101 stuff. If it scares you, then you probably shouldn’t be operating a pirate radio station. The purpose is the educate listeners and operators, so they know exactly what information can be gleaned from observing signal reports. It’s better to know exactly what can be done with this information, than to stick your head in the sand and pretend it doesn’t exist.

As has been discussed on this blog many times before, daytime propagation on the 43 meter band (where 6925 kHz is located) is considered NVIS (Near Vertical Incident Sky Wave). The radio waves go up, and are reflected back to the Earth for a fairly short distance around the transmitter site, usually a few hundred miles at the most. Attenuation by the D layer limits distant reception. At night, it’s almost the opposite reception pattern, as the D layer fades away, allowing distant reception. And the weaker F layer limits or eliminates NVIS reception, resulting in a skip zone around the transmitter, where the signal cannot be heard. The resulting reception area is shaped roughly like a doughnut.

So, for a daytime transmission, if one looks at a set of reception reports (as well as “no reception” reports, which can be equally useful), it becomes very easy to guesstimate about where a transmitter is. Not exactly of course, or even to a particular state, but certainly within a hundred miles or two. There will be a cluster of strong reception reports around the transmitter site, out to a few hundred miles. The maximum reception distance will vary a lot with transmitter level, antennas, and propagation conditions, but is likely under 1,000 miles. Look at where all the reports are coming from, especially the strong ones, find the center, and you have a good guess as to where the transmitter is.

At nighttime, listeners too close to the transmitter site (in the skip zone) will hear nothing, or at best a very weak signal. And during the transition from NVIS to DX propagation (see Going Long and An Interesting Example of a Station Going Long) the received signal will start to peak, and then suddenly cut out. Observing when this happens at a variety of listener sites provides other clues as to the transmitter location. If the F layer height and ionization values are known (and they are available in real time online) the distant to the station can be roughly determined when the station goes long. Do this for several receiver locations, and you can guess about where the transmitter is.

One ruse some operators have used in the past is to give misleading reception reports with a low signal level, using their real name and location, as just a regular listener. This is extremely dangerous, as if anyone is paying attention, their very weak signal report can stand out like a sore thumb if there are reports from others in the same area, with much stronger signal levels. Likewise, if you’re an operator, providing a completely bogus QTH doesn’t fool the FCC one bit. Announcing a QTH out on the Great Plains, while you’re really on the East Coast, doesn’t fool anyone when you’re being heard on the East Coast with an S9 signal at local noon. It just reminds everyone that you failed PROPAGATION 101. While shortwave propagation can be odd at times, there are limits. The laws of physics still must be obeyed.

The FCC and other radio enforcement agencies of course don’t have to rely on crude techniques such as these to locate transmitters. They have modern DFing equipment that can quickly and accurately locate a pirate station. The only reason they haven’t busted a given pirate is because, (as much as this may hurt to hear) that pirate is not important enough to get a visit. For now.

The commercially available WJ-9012 HF Direction Finding System, for example, boasts an error of less than 2 degrees. At a distance of 200 miles, that’s about 7 miles. Presumably the FCC has much better equipment.

While not announcing your location is probably a good idea (if for no other reason than to come across as taunting the FCC), in reality it doesn’t do too much to protect you from the radio authorities. Not interfering with allocated radio services, especially government and military, as well as operating from random remote locations, will go a long way to avoid getting The Knock.

Keep Safe!

mySdrPlayback – Mac OS X App to Play Back SDR I/Q Recording Files

I use an RFSpace netSDR to record the 43 meter (6800-7000 kHz) pirate radio band, overnight and often in the daytime as well. I then go back and check the recordings, to see what stations have been on the air. This lets me catch lots of broadcasts even when I am away from the shack.

Going through the recordings with traditional SDR software can be extremely tedious. You literally have to play the recordings at a real time rate, hoping to stumble across a transmission. Even being able to skip ahead and back is not much better.

So I ended up writing my own app to make the process of analyzing SDR recordings for interesting transmissions much easier and faster. I’ve just recently made this app available for others to download and use. It’s called mySdrPlayback (although it could probably use a more catchy name).

This is what the program window looks like (click on it for an enlarged image):

When the app loads, it reads in a list of all the recording files from the directory you have told it they are stored in. Clicking on a file loads it. A waterfall of the entire file is created, that is what you see in the large area on the right side of the window. The x axis is frequency, the y axis is time. Any transmissions are immediately obvious, such as a pirate on 6925 in AM mode, as well as WWCR, also in AM mode, on 6875 kHz. SSB and the various digital modes also have distinctive visual appearances. In no time, you can tell what type of transmission it is just by looking at it.

Files created by SpectraVue, the SDR app that RF Space supplies with their radios, SdrDx, the third party app also for RF Space radios, as well as files created by Perseus can be read. Other file types could probably also be added, if their exact format is known.

Selecting a portion of the recording file to play back could not be easier. Just drag select with the mouse by drawing a rectangle around it. Select the mode, and click Play. The frequency and time limits are displayed in the Secs Start/End and Demod fields when you drag select, you can also edit them in the boxes by hand if needed, to fine tune things.

The buttons to the left and right of Play let you skip playback behind or ahead by 10, 30, or 60 second increments, or even by 5 minutes. This makes it easy to jump around, looking for an ID. An S meter updates during playback, showing the signal strength in dBm.

The Demod To File button will demodulated the entire selected transmission to a WAVE file. You can then feed that into a decoding program, such as MultiMode if you want to decode an SSTV or other digital mode. You can also convert it to an mp3 file using your own utility, if you want to post it for others to download.

mySdrPlayback is only available for Mac OS X. There is no windows or linux version, and there never will be one. It’s written in objective-c and uses the extremely powerful and feature rich cocoa API. That makes development extremely easy, but is only available for the Mac. It can be downloaded from the program page: http://www.blackcatsystems.com/software/sdr_iq_recording_playback_program.html

Anonymity For Pirate Operators and Listeners

Today, the internet is used for virtually all forms of communications between pirate listeners and operators. Loggings are posted to message boards and mailing lists. Reception reports are sent to email addresses, with eQSLs coming back to the listener by email. And listeners (and some times operators) engage in real time chats via IRC and chat rooms.

The advantages over the older forms of communications in the dark ages (pre-internet) are numerous. The most important is undoubtedly the almost instant speed with which information can be received. Once the first listener logs a station (on a message board such as the HFU / HFUnderground or via IRC), other listeners can immediately learn of this transmission, and tune in, while the station is still on the iar. Back in the old days, the logging would be sent to a SW/DX club newsletter editor (I was one for the ACE back in the 90s) where it would sit until other loggings arrived. Then the loggings column would be edited and finally the newsletter published and mailed to club members. By the time others read the logging, it was weeks if not months old.

Likewise, operators can browse the message boards or chat rooms, and learn in real time how their signal is being heard. They can also find out if there is interference, and they need to move to another frequency, or go off the air. There have been many cases of a pirate operator learning that another operator was also on the air, and they could quickly change frequencies to avoid continued interference. Or wait and not go on the air until the first station was done with their broadcast.

Reception reports and QSL verifications are almost exclusively conducted via email today. The listener sends their report to the station’s email address, and gets an eQSL back by reply. Verifications are often received in a day or two, sometimes in a matter of hours or even minutes. In addition to the instant gratification factor, there’s a huge cost savings. No need for the often cash strapped operator to print up paper QSL cards, and for listeners to spent money on postage. And the pirate operator and listener don’t have to run the risk that the maildrop they use might share personal information with others, as has been rumored to have happened in the past.

eQSLs are not “fake” QSLs. They are verifications that you heard a transmission, and are just as real as a dead tree QSL. Anyone who claims otherwise most likely has impure motives for trying to convince you to send them your personal information.

Operators and listeners do need to be concerned about possible lack of privacy issues with internet based communications. These risks, and their solutions, include:

Email Anonymity

Many email systems include the originating IP address of the sender in the message headers. In other words, your IP address. With this IP address, your location can be determined, often to your city. Of the supposedly anonymous email services, yahoo and hotmail are known to include your IP address, making them not very anonymous. Gmail, on the other hand, does not include your IP address, making it the preferred email service. Most new operators are using gmail, but many older stations continue to use yahoo or hotmail accounts. This is extremely dangerous, and operators should consider switching to gmail. Likewise, listeners who wish to maintain an anonymous identify should also consider using gmail, if they aren’t already.

Message boards / Chat Rooms / Web Sites

Many pirate radio resources exist on the web. These include message boards, real time chat rooms, as well as general purpose websites. These sites all use web servers and clients, and share the same privacy risks.

When you connect to a web server, it records your IP address and what pages you viewed, as part of the server logs. The administrator of the website often uses this information to determine how popular various pages are on the site, as well as what parts of the world visitors are from. More sophisticated analytical tools can even “follow” a user as he navigates the website, to observe in what order he traverses the various pages. Generally this information is not used for nefarious purposes, but rather to help the website administrator improve the quality of the site, and increase the number of visitors.

Your IP address can be used in the same way as with email headers, to roughly determine your location. Of course, this is only relevant if the person examining the logs knows who you are. If you are just a visitor to the site, not logged in, then your IP address appears alongside the hundreds or thousands of other visitors, and there is no information that links it back to your identity. You’re just 192.168.0.1, or whatever your IP address happens to be.

If you’re logged into the site, then your IP address is of course linked to your user name. If you log in as a pirate operator with your station or DJ name, then the weblogs can be used to roughly determine your geographic location from the IP address. The solution is to use an anonymous web proxy. This is essentially another web server that you connect to first. Then you tell it the URL of the site you want to visit. All data between you and the final website is passed between the proxy, which hides your IP address. You just have to trust the web proxy that you use!

IRC (Internet Relay Chat)

Users connect to IRC servers with client software. Your IP address is available to IRC operators (usually not an issue since most of them have no idea what pirate radio even is) and sometimes to other users (which can be an issue). Many IRC servers mask the IP address, usually by changing the last octet. While this does hide your exact IP address, the remaining three octets are usually sufficient to roughly determine your location, as with email and the web. One solution is to use a pseudonym as your IRC nickname, not related to your actual name or station/DJ name. That way, you just appear as another pirate radio enthusiast, and no one knows who you really are. Another is to use a web based IRC client, and connect to it via a web proxy. Problem solved.

Safer web browsing

If you’d rather avoid being tracked on unfamiliar or “hostile” sites, try the Startpage search engine, which features the option of using Ixquick proxy to mask your location and machine type.  Many free web proxies will mask your location (IP), but few will mask your machine type.  Are you that one guy using Windows Vista on a PC with monitor resolution set to 800×600?  If so, you’re easy to spot. Ixquick proxy randomly rotates among a dozen or so types, making it more difficult for snoopy web/blog owners to identify visitors.

Note that some proxies will disable certain functions including Javascript.  It will also hinder the site’s web traffic logs and ad revenue.  If you trust and support a site, consider unproxying and giving the site owner the benefit of your visit.  It’s your choice, so be informed and choose wisely.  And if you get serious about web browsing security, check into the Tor project and other proxy options.

Personal Information in Documents and Images

If you create and send documents and images (such as PDF files or JPEG pictures) be aware that some applications include personal information in the document’s metadata. This could include the name of the registered user for the program.  There are various tools out there that can open documents and display any metadata that is present. If you’re concerned, get some of these programs and make sure that files you create and send don’t compromise your identity.  The free/shareware image editor Irfanview can be used to view metadata and, if desired, re-save images such as eQSLs with metadata stripped for security.

Enjoy Pirate Radio

Don’t let these issues dissuade you from using the internet as part of your pirate radio hobby. If you follow a few simple steps, you can feel secure about your privacy. And don’t let the Chatrooms and the Internet are Eeeeevil crowd scare you, they have ulterior motives for encouraging you to use their snailmail maildrops and other ancient forms of communications – namely to collect more details about you.

Building a Sky Loop Antenna

Due to the continuing interest in the sky loop antenna, I’ve put together some notes and suggestions on the construction of these incredibly well performing antennas. One note – the sky loop is generally used as a receiving antenna. I don’t have any first hand experience using one for transmitting. Typically, the SWR is all over the place, so you’d likely need a tuner if you wanted to transmit with one. For receiving, no tuner is needed. The sky loop covers all of HF, and often down into MW as well, depending on the size.

First, the basics. A sky loop antenna is a large loop of wire mounted in the horizontal plane. How large? Typically, as large as you can make it. Bigger is generally better when it comes to sky loop antennas. Mine has a perimeter of 670 feet, and I am considering enlarging it. Often, this antenna is run around the property line of your yard, maximizing the length of the antenna as well as the cross sectional area. While the antenna is called a loop, this does not imply that it needs to be circular in shape. While a circle does maximize the area for a given length of wire, other shapes work well. Remember, you’re trying to maximize the amount of wire (perimeter of the loop shape) and area, so try to use as much of your yard as possible, although you don’t want to zip zag back and forth too much. You want to make the largest area polygon that you can. The likely constraint will be what trees or other supports you have available for getting the wire in the air. And of course, remember that safety is important – keep the wire far away from any overhead power lines.

Because the antenna is in the form of a loop (a continuous path of wire from one of the transmission line terminals to the other), it is inherently a low noise antenna. Comparing a sky loop to a dipole, you will find that the noise levels are generally much lower.

How to get the wire in the air? There’s lots of ways, what I find that works best is to put rope up into trees around the path I want the antenna wire to run. One end of the rope has an antenna insulator, the rope then goes up over the tree (or a branch or whatever you can manage) and the other end is secured to keep the insulator up in the air. I just put a large nail in the tree, pull the rope taut, and then wrap it around the nail several times to secure it. often I will put a second nail in the tree as well, a few feet below the first, and then coil the excess rope around the two nails, to keep it neat and tidy, and away from rope eating lawn mowers. Untying rope that’s been wrapped around mower blades is no fun. Been there, done that.

I use an EZ Hang to put rope up in trees.

The antenna wire itself then runs through the other end of the insulator. Since the wire is in a loop, this requires some planning, you need to put a bunch of insulators on the antenna wire, as many as you will need, and then use one for each of your antenna support ropes.

Here’s how I do it:

The EZ Hang shoots a fishing weight up and over the tree. There’s fishing line attached to the weight. Once the weight lands on the other side of the tree, I take off the weight, and attach the end of the rope to the fishing line. Then I use the reel on the EZ-Hang to pull the rope back through the tree, until it gets down to the ground at the EZ-Hang. Now I’ve got the rope going up and over the tree and back down. Then I can cut the rope off the spool, and attach an insulator (with the antenna wire already running through the other eye) to one end of the rope, and pull it and the antenna wire up into the air.

If your antenna is relatively small, you may get away with just four or so insulators, one at each corner of the loop. As the antenna gets larger, you end up with a lot of sagging due to the weight of the wire, and you need several intermediate support insulators on each side of the loop, to limit the sagging.

As far as the type of wire to use, there’s several possibilities. First, of course, is normal stranded copper antenna wire. I, however, got a great deal on a 1000 ft spool of #16 insulated wire. I went with that because the antenna wire would be going through trees and leaves, and wanted to minimize the chances of the wire being shorted out to ground. While probably not as important with a receiving antenna like this as with a transmitting antenna, I decided to play it safe. Also, the insulation happens to be green, and I think it does a good job of helping the wire to blend in the trees, making it difficult to see.

There’s a lot of debate as to how high the wire for a sky loop antenna needs to be. Computer modeling shows that the higher it is, the better it is at picking up low angle signals from DX stations. And in general with HF antennas, higher is better. On the other hand, if it is difficult for you to get the wire up very high, a sky loop with low height wire is still going to perform better than no sky loop at all. I started out with several sides of my sky loop being relatively low, 15 ft up or so, because that is what I could easily manage. Then, over time, I have raised those sections as I was able to. I do think the antenna performs better now that it is higher up, but I am not sure that the effects are dramatic. So my rule of thumb would be to get the wire up as high as practical, but I don’t believe there is any magical height you must achieve. Right now, the height varies between about 25 to 50 feet.

As I mentioned at the beginning of this article, the SWR (and feedpoint impedance) of a large sky loop antenna is all over the place. If you think about it, for many SW bands, the antenna is several wavelengths long. In my case, the antenna is about 670 (206 meters) feet in perimeter. So for the 43 meter pirate band (say 6.925 kHz), it is about 4.75 wavelengths long. At 15 MHz, it is over 10 wavelengths long. That said, I do not use an antenna tuner. While you could, I don’t think it is necessary for receiving applications. The antenna collects lots of signal, and I don’t believe you need to squeeze out the last S unit.

Since the impedance is usually quite high at any given frequency, I chose to feed the sky loop antenna with a 12:1 balun. I didn’t choose this based on any calculations, I just happened to have one available. I do keep meaning to try swapping other baluns, such as a 4:1 or even a 9:1, to see if there is any difference in the performance, but I have not gotten around to it. I do think some sort of balun is desired for the sky loop antenna, vs feeding it directly with just coax. You may be able to feed it with ladder line, but I have not tried that.

For the coax, I used RG6, which is commonly available and used for TV. I chose RG6 because it is very cheap, and personally I am sick of putting PL-259 connectors on coax. RG6 has F connectors, and I use an F to PL-259 adapter at the balun, as well as to connect to the radio inside the shack. There’s certainly no requirement to use RG6, you can use any good quality coax.

Performance does suffer once I get down to about the middle of the Medium Wave band. While I can pick up stations all the way down to 530 kHz, the signal strengths are much less than the upper end of the medium wave band. If you assume the antenna is a basic loop, the resonant frequency is about 1460 kHz, so this seems reasonable. I get excellent reception in the X band, 1600-1710 kHz. One of my reasons for wanting to increase the length of the loop is to hopefully get better performance lower down in the MW band. Although simple math shows that even if I doubled the length (which I am not sure I could do), the resonant frequency would still only be about 730 kHz.

Another possibility for worse performance on the lower part of the MW band is the choice of balun, as I addressed above. The impedance of a one wavelength loop antenna is about 120 ohms. With a 12:1 balun, that is reduced to about 10 ohms. And at the lower end of the MW band, the impedance is likely much lower.

If you’ve read my This is why you should disconnect your antenna during a storm article, you’ve seen what happens when you have a thunderstorm nearby. Your antenna is often quite good at collecting that energy, and sending it to your radio. There’s lots of good lightning protection devices out there that you may want to look into. Personally I also disconnect my antenna when there’s a storm, or even the possibility of a storm, especially if I am not going to be around. It takes a few seconds, and can protect your radio. It doesn’t take a direct lightning strike to damage a radio.

I hope this article will motivate several listeners who have the room to consider installing a sky loop antenna. You won’t be disappointed.

Baltimore’s BBQ That Isn’t BBQ – The Pit Beef Sandwich

What some refer to as Baltimore’s version of BBQ isn’t BBQ at all. Of course, what would someone from the New York Times know about BBQ? I’m referring to the pit beef sandwich.

Pit beef is prepared by grilling a beef roast under high heat until it is medium rare, then sliced thin, and eaten as a sandwich with horseradish. Here’s how to make it:

First, the roast. I prefer sirloin tip, although some use top or bottom round. I don’t like the latter due to the thick wedge of fat then runs through it. I’ve heard of people using eye round, but grilled eye round is barely fit for human consumption, so I really can’t suggest that.

Next, the spice rub. I use two portions of salt to equal portions of ground red pepper, onion powder, garlic powder, paprika, oregano, and a little ground red pepper. There’s no exact science here.

Coat the entire roast with the rub.

Then put it in the fridge at least a day before you’re going to cook it.

Next, take the roast out of the fridge, and let it sit on the counter for an hour or so, to warm up a bit, so when you grill it, you’ll maximize the volume that stays at medium rare. Of course, the USDA food safety police say this is a dangerous food safety violation.

Meanwhile, get your grill going nice and hot, and put the roast on.

Grill with the lid off on high heat.

When your instant read thermometer says 123F, you’re done. That’s medium rare. The USDA says 145F is medium rare. They’re idiots.

Next, you want to tent your beef under aluminum foil, to let it rest, so you don’t lose the juices. Don’t skip this step.

While your beef is resting, you want to slice your onions. I use an electric meat slicer, since I’m going to use it to slice the beef anyway.

Slice your onions thin.

Slice your beef thin as well. Sure, you can use a knife if you’re good at it and not lazy. Me, I’m lazy. And I have a deli slicer, so I may as well use it.

Put some horseradish on your bun, the beef, and the onions. If you’ve got mayonnaise, throw it away now, before someone uses it.

Serve with chips. Ideally Grandma Utz chips, cooked in lard.

The radio connection? The Baltimore Hamboree and Computerfest held at the Maryland State Fairgrounds used to serve pit beef sandwiches. Now that there’s no outdoor tailgating, I’m not sure if they do anymore.